
Contributions
Contribution Charge Codes
It’s that time of year again — dues billing is here. In addition to setting up new dues charge codes, it is necessary to create new charge codes for your various contributions. Setting up a charge code for contributions requires just a few simple steps.
There are various ways to add a charge code, including the Charge Code Table, Charge Code Table by Set, or using the Search Menu field type in either menu.

Locate last year’s Charge Code. Press “F5” to zoom and open the Charge Code Information Form for last year’s charge code. You can use the Copy Charge Code feature if you have an existing charge code from the previous year.
If you don’t have any, press “Ctrl+E” to open a blank Charge Code Information Form.
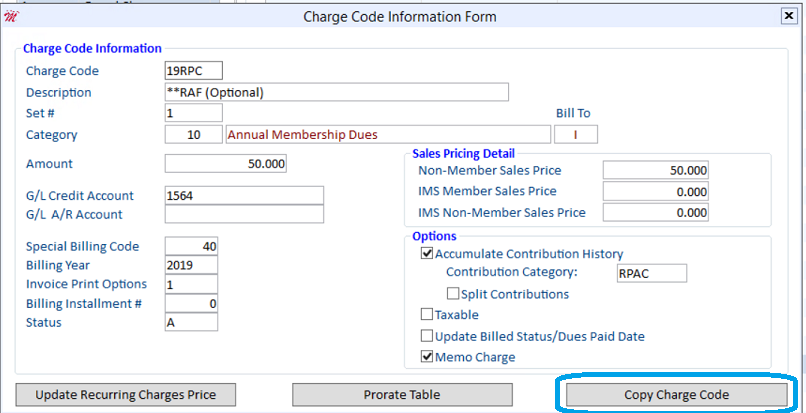

Once the charge code has been created, it will open a new Charge Code Information Form for you to verify the information.
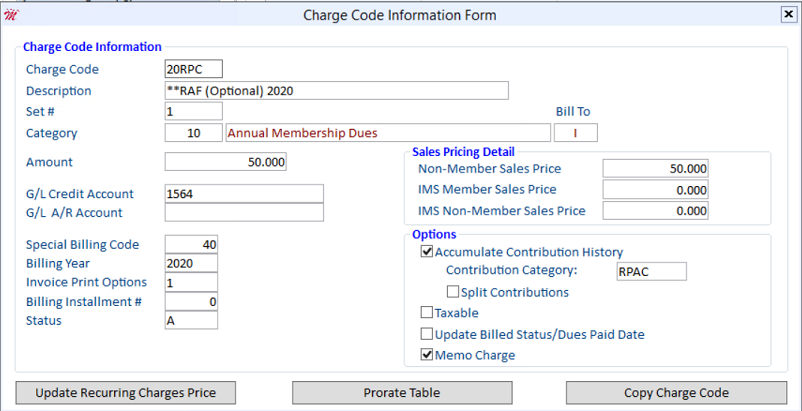
When creating a new contribution charge code, you will need to pay particular attention to the following fields in the Charge Code Information Form.
Billing Year - Set the billing year to the year for which the charge code applies. If the Billing Year field is set to 2020 and payments are received in 2019, the contribution will be recognized for 2020. The Billing Year field is also necessary to run accurate contribution reports.
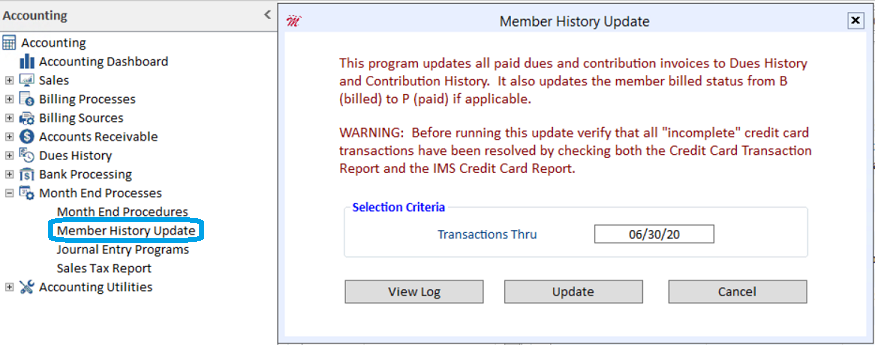
Accumulate Contribution History - Check this option so the software will update information in your member’s contribution history. The update will occur when payment has been received for this charge code and a Member History Update is run.
Contribution Category - The code that identifies where to direct money received as a contribution.
Split Contributions - If checked, then contributions using the charge code will be split according to the percentages in the Contribution Percentage Table. (This option is primarily used by state associations.)
Memo Charge - Selecting this option indicates that this charge code is a voluntary charge. The charge code will appear as a memo charge on a dues-related invoice but will not be added to your accounts receivable. (Statements can be set up to include memo charges in the Statement/Invoice Set up Form by selecting Print Memo Charges.)
Once your contribution charge codes are correctly set up, you can include them in your annual dues billing. For more information on dues billing, please see our "Billing Procedures" article in the Magic Resource
Contribution History
Are you interested in looking up a certain member’s contribution history? Maybe you want to track the top contributors in your association and use this as a tool to solicit additional contributions. The Contribution History Report compiles information on contributions received from one or more members, based on the criteria you specify.
Simply open the Contribution History Report utility and click the “Create Report” button.
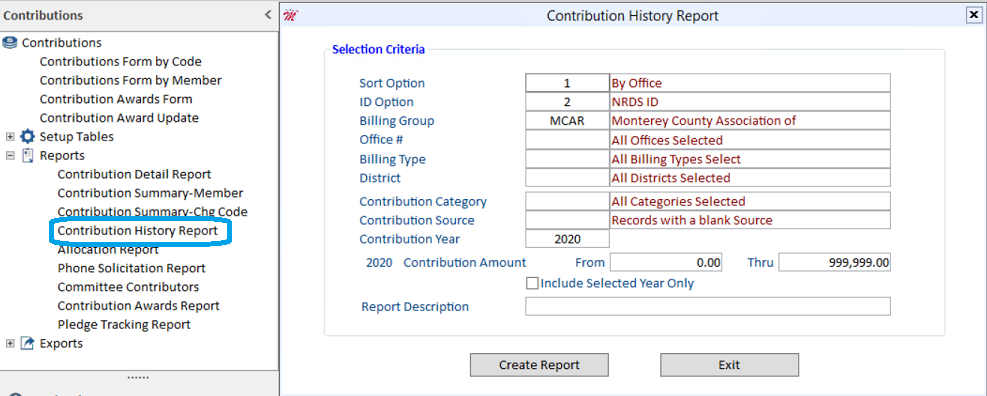
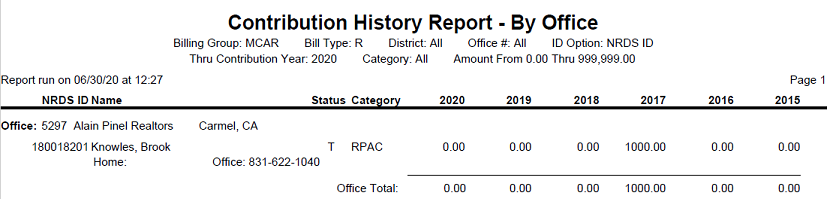
This report selects each member who contributed for the year and criteria you specified, with the history of his/her total annual contributions for six years.
NOTE: If you feel the report is not reflecting the correct contribution amounts, run the Member History Update. This process will place any qualifying Charge Code in Dues and Contributions history.
Make sure that…
- All of the contribution charge codes are set up properly in the charge code table.
- Charge Codes are assigned to the appropriate category.
- The Special Billing Code is set to 40.
- The Accumulate Contribution History option is checked.
- The Billing Year is correct.
Contribution Reports and Exports
Members make contributions to various programs and initiatives, such as RPAC. They also appreciate receiving recognition for their financial support of these programs. You can easily run a contribution report to obtain a list of members and details surrounding their contributions, or you can export your contribution data to a file for use in a spreadsheet or other application.
NOTE: Run the Member History Update (Managers > Accounting > Month End Processes > Member History Update) before completing any of the following steps, in order to make sure that all recent contributions are posted to history and will be included.
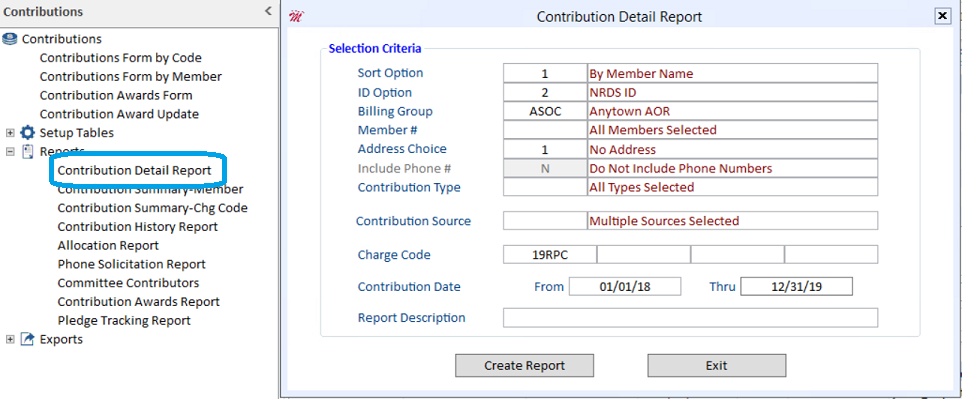
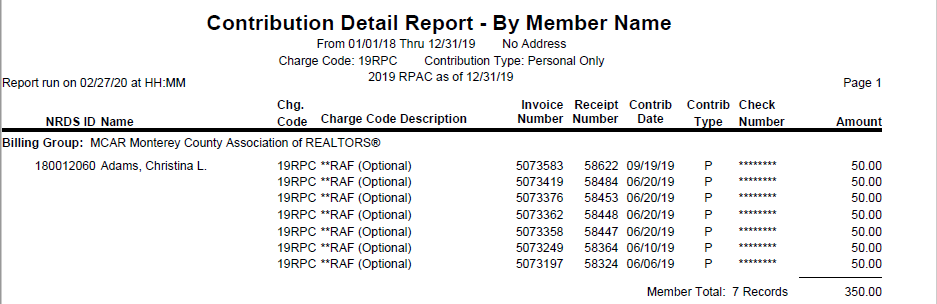
From the Contribution Detail Report form, enter the desired criteria and click the “Create Report” button. Press “F1” for Help, if needed.
Contributions Form by Code – Run a Contribution Export
Using the Cloud AMS Export Manager, you can create a spreadsheet containing any contribution information that you need. After selecting the desired contribution Charge Code, you will see a detailed list of contributions on the lower part of the form. Click the “Export” button on the Actions bar to open the Cloud AMS Export Manager.

Select a field from the list of Available Fields (105 available fields to choose from) and click the “Add” button. The field will then display under the Selected Fields section.

To save the export file for future use:
Save Export as – Enter the File name and click the “Save” button.
Then click the “Export” button to view your selections in an Excel spreadsheet.
Select Export to Load – Click the down arrow in the drop-down to find the saved file and click the “Load” button to display the selected fields. Then click the “Export” button at the bottom to see your records in an Excel spreadsheet.