
Education
Canceling Member Registration in a Class/Event
Many times, a member will register for a class or event and later unexpectedly need to cancel. A cancellation may involve several scenarios: Did the member pay in full at time of registration and is now due a refund? Should the credit remain on the member's account to be used at a later date? Do you collect a cancellation fee? Canceling a member's registration in Cloud AMS will also adjust and correct that person's accounting history.
The following steps will instruct staff on how to cancel a member's registration in education, and how it affects the member's accounting records.
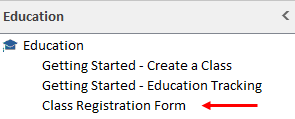
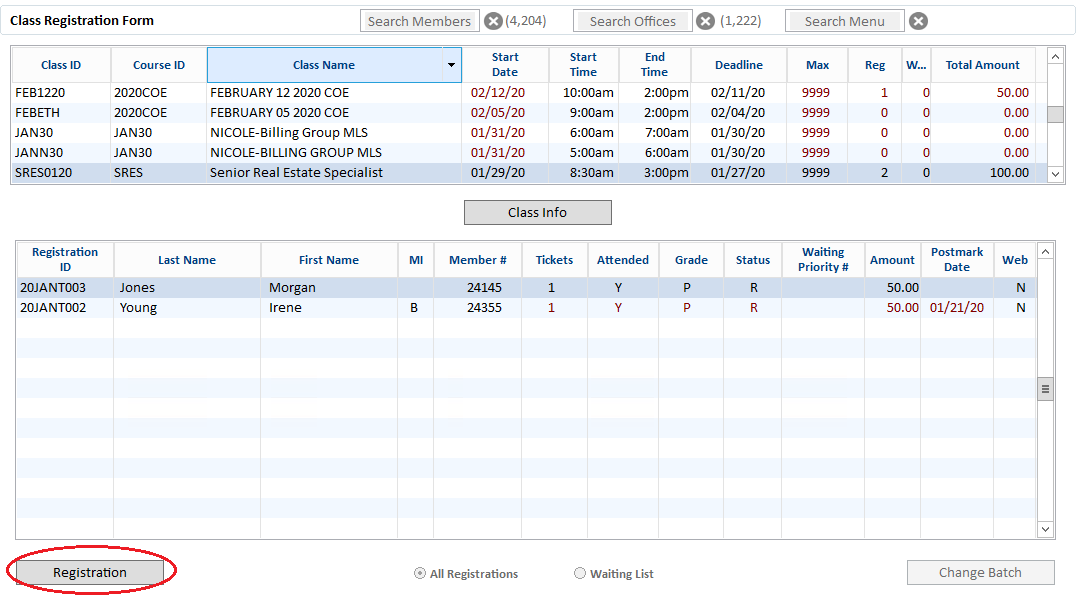
Select the Class ID and the registration to cancel.
Click the Registration button to open the member’s Class Registration Form for the class.
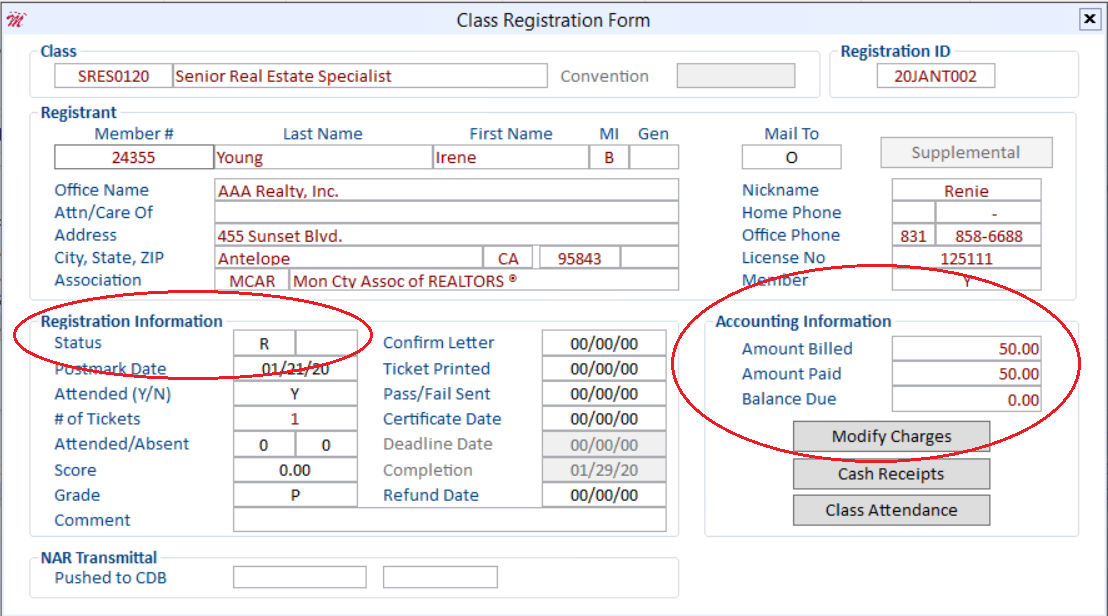
Change the registrant's status from "R" (Registered) to "C" (Cancelled).
A message will pop up to confirm you want to cancel this registration. Then you are prompted to enter a batch ID:
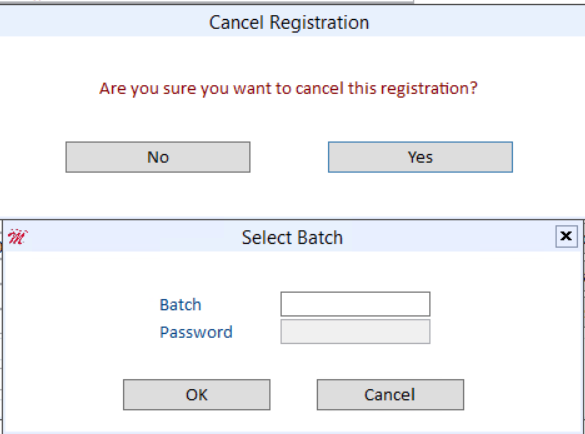
The batch is required because an accounting adjustment will be automatically generated. Note that a cancellation does involve the creation of a new invoice.
After this step, the Class Registration Form reflects the cancellation:
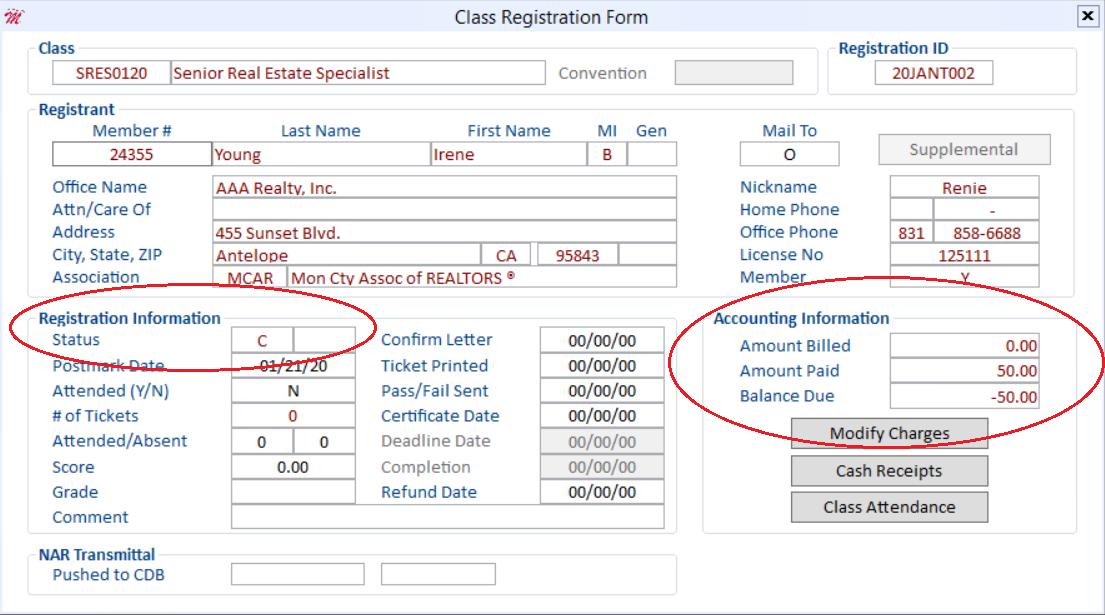
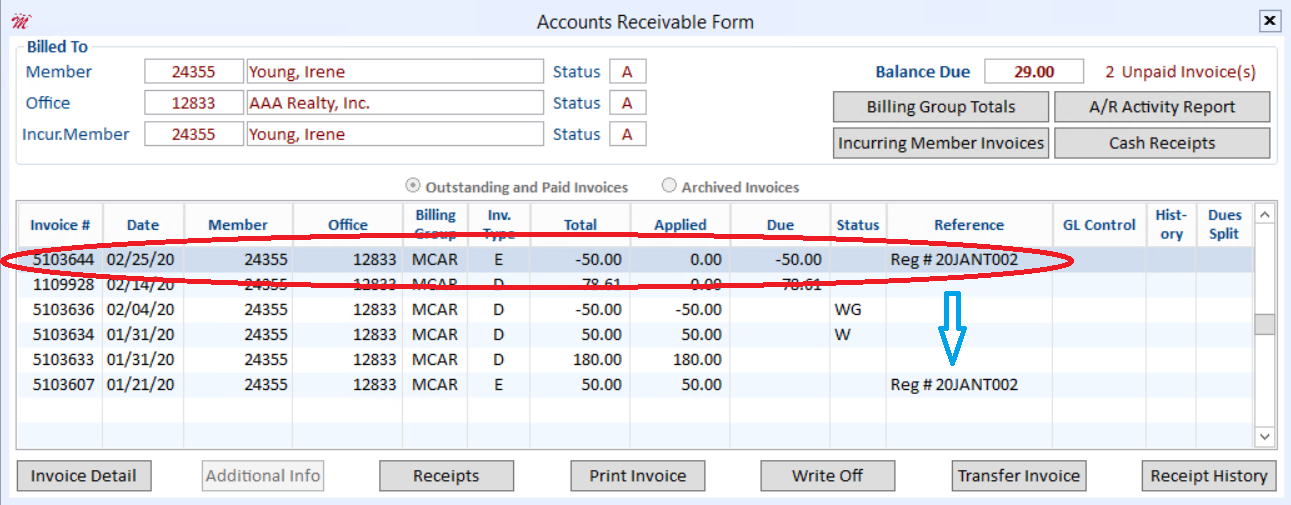
If we look at the member's accounts receivable history (below), we can see that a negative invoice has been created and applied against the original invoice.
The member's accounts receivable now reflects the off-setting transactions and since this member paid for the registration it is now showing a credit balance.
The Reference field also shows the same reference as the original registration.
Common Code of Ethics Education Tracking Errors - Not Updating from Pending
If your association uses the Create Education Tracking Utility and the Education Tracking Update, you may occasionally notice that the Status field in a member’s Requirements Tracking Form does not change from Pending to Completed, as you would have expected.
In this article, we will discuss the four most common reasons this may occur:
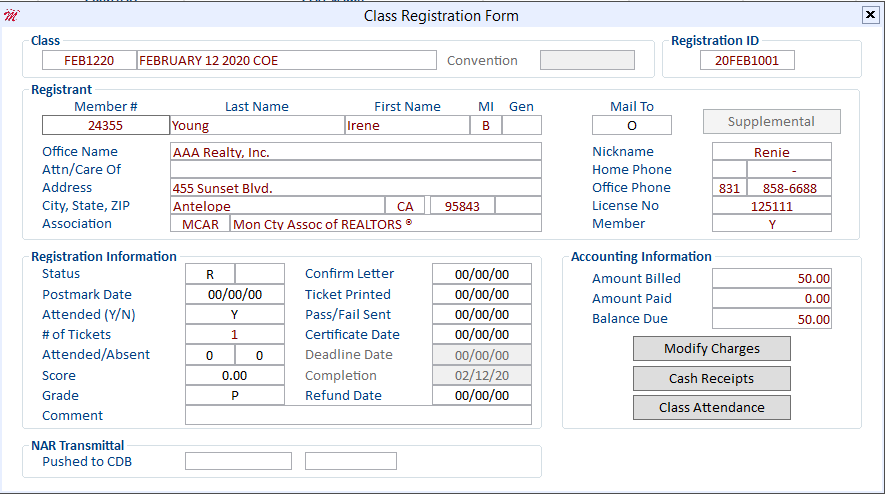
Open the member’s Class Registration Form. The Attended (Y/N) field must be set to "Y," and Grade field must be P for passing.
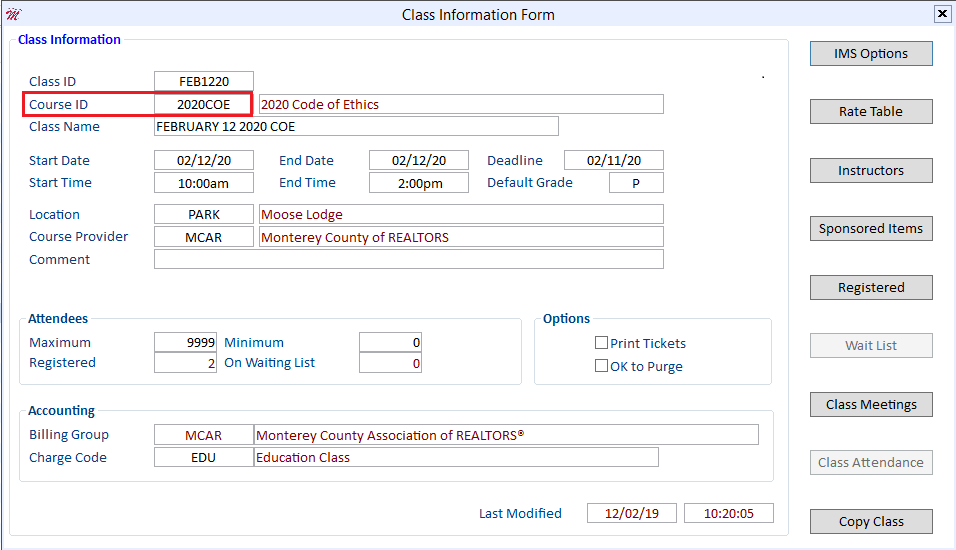
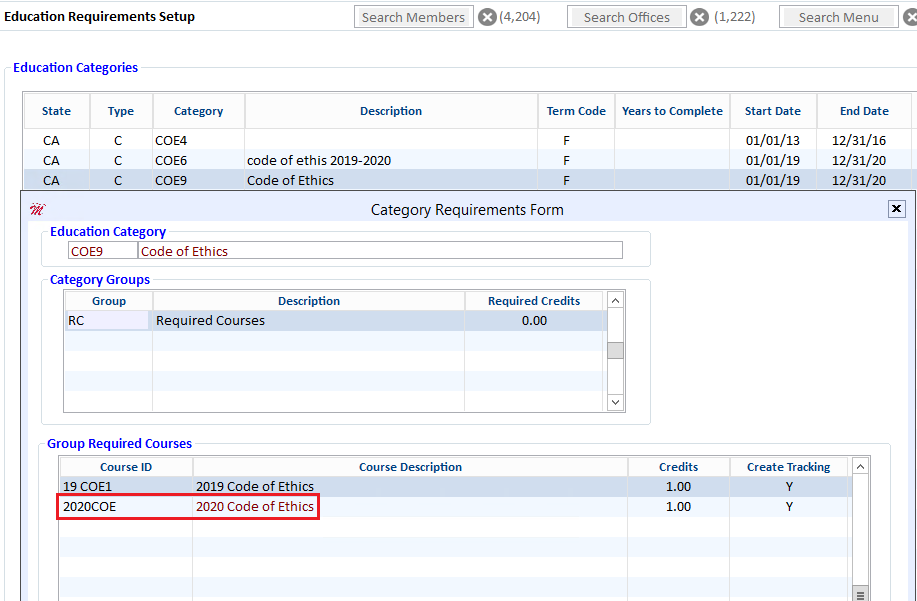
Verify that the Course ID associated with the Class ID has been set up in the Education Requirements Setup form. In the example above, Class ID "FEB1220 has a Course ID of 2020COE". Therefore, the 2020COE Course ID must exist in the Category COE9 on the Education Requirements Setup Form
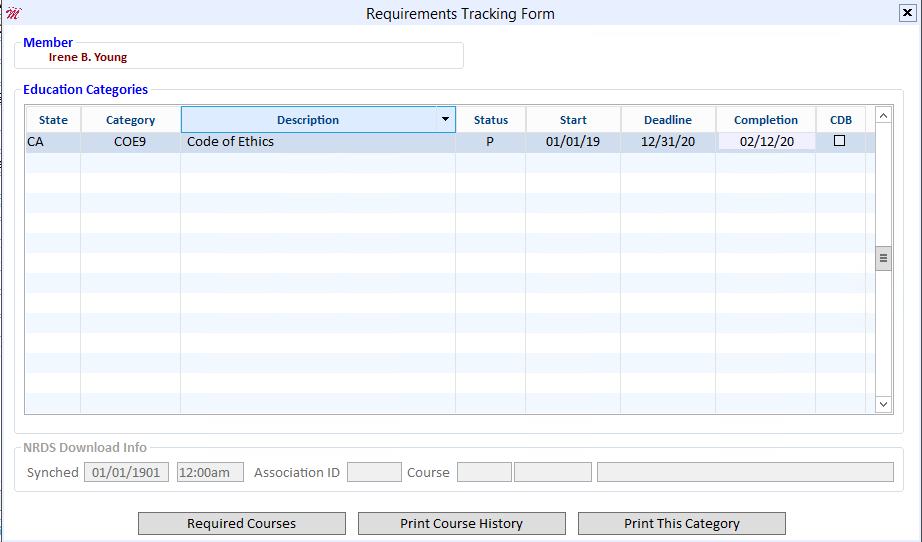
Open the member’s Requirements Tracking Form. Locate the Completion date field. If the Completion date has been manually updated, but the Status is still set to P, the Education Tracking Update will not update the member’s record. The Education Tracking Update only updates qualifying records when the Status field is set to "P" and the Completion field is set to "00/00/00." Modify the Completion date to 00/00/00 to have the system update this record.
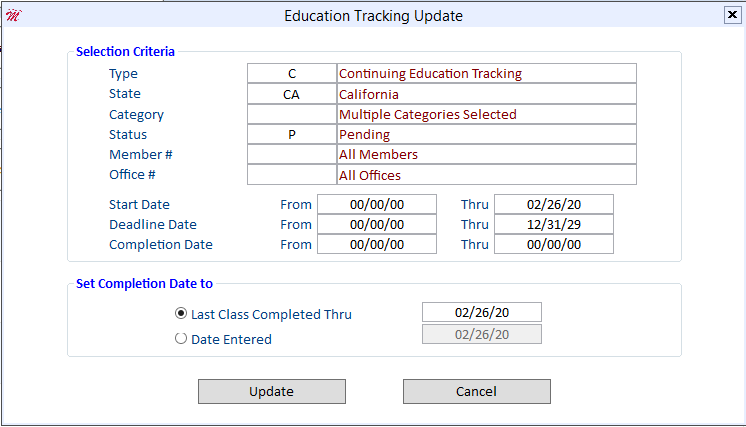
Review the criteria that you entered in the Education Tracking Update. Remember, you want the utility to modify the status for qualifying members whose status is currently pending (prior to running the update). Therefore, the Status field must be set to, because these are the records you want to change. Do not enter Completed in the status field, as this would cause the utility to locate only members whose status is already set to Completed.
Education Tracking Setup
Cloud AMS provides you with a way to keep track of your members’ Code of Ethics requirements/designations and whether or not requirements have been met for the current COE Cycle. Education Tracking is an internal process and does not transmit or report Code of Ethics information to any other entity. This article will address Code of Ethics tracking.
Education Tracking records can be manually updated from the member record itself. Do not use this process if you are going to use the Education Tracking Utilities since the utility will revert all of your manual changes. You should either update records manually or by using the utilities but never do both.
Setting Up Education Tracking
Cloud AMS provides a Getting Started guide for Education Tracking. Each button in the Getting Started guide is a shortcut to a form or module in the system. As you complete the steps, a check mark will display and you can easily pick up where you left off if you are called away from the process. To perform each step, simply click the corresponding button.
![]()
Step 1 – Create the Education Category
![]()
![]()
From the Education Requirements Setup Table, press “Ctrl-E” to create a new category.
Your state will appear by default. Press “F5” to zoom and select your category type. For COE tracking, use the “C” code. Category ID is a freeform field and should have a structure that is easily recognizable, such as COEC6 (code of ethics cycle 6). Enter your description. The Term Code controls the method of calculation when using this category. For COE, we will select “F” for Fixed. Enter the date range 01/01/19 thru 12/31/21, which is the period during which members are required to complete Code of Ethics for this cycle.
![]()
Next, you will assign Courses to the Category. Any Education Course that qualifies to fulfill COE requirements must be entered in the Category Requirements Form. Click the “Requirements” button and under Category Groups, enter the Required Credits for the Category.
Under Group Required Courses, press “F5” to locate the qualifying course and enter the number of credits your course will fulfill. Mark the Course with “Y” under the Create Tracking field. Repeat this step for any course which qualifies to fulfill Code of Ethics requirements.
Note that Course Setup is very important!
![]()
Before adding a Course to a Tracking Category, be sure that it is set up correctly. The Course Type should be set to “ACC” (Accredited). Click on Certification Info and press “F5” to select your state in the State field, then enter the number of Credits the course is worth.
![]()
Step 2 – Create Member Tracking
This utility will add the education tracking line on the qualifying member record. Press “F5” to zoom into the Update Option field and select option “2” (By Association/Billing Type). Zoom into the Continuing Ed Type field and select option “C” (Continuing Education Tracking), then select your state. Press “F5” to zoom into the Category field and select your Category for the current cycle, then select your Association ID. In this case, the Category is COEC6 and Association ID is MCAR.
![]()
The next step is to zoom into the Billing Type field and use the Multiple Billing Type Selector to select your qualifying Billing Types.
![]()
Only Realtor Members should have an Education Tracking line on their member record.
![]()
Tracking is created so that the record is in the “P” (Pending) Status with no Completion date. From the Member Information Form, click the “Req. Tracking” icon in the Actions bar to see the tracking record.
Now that members have the education tracking line on their record, it’s time to update the line for all members working toward fulfilling the COE requirements.
Note that Class Setup and Registration Records are important!
![]()
Any Class which is assigned to a qualifying course must have a Start Date and End Date in the past in order for Cloud AMS to pick up the registrant when you run the Education Tracking utilities.
![]()
Member Registration must have Attended set to “Y” (Yes) and a Grade set to “P” (Passed). The “P” Grade should be set up with a Credit/No Credit value of “CR” (Credit).
Step 3 – Update Member Tracking
![]()
Type will be set to “C” (Continuing Education Tracking). Enter your State and select the current Category. The Status will remain “P” (Pending) so that qualifying members in the Pending status are picked up and changed to the Completed status. Leave the Member # and Office # fields set to “All Members” and “All Offices” respectively.
Modify the Start Date “From” and “Thru” fields to reflect your current Tracking Cycle. For example, start with the beginning of the cycle, 01/01/19, and go through the current date. Do not enter a future date the “Thru” field. Skip the other date sections.
Leave the “Set Completion Date to” field as “Last Class Completed Thru” and leave today’s date entered here. Then click the “Update” button.
![]()
Once the update has completed, you will be provided a report displaying the members who have been updated from a Pending status to a Completed status.
Step 4 – View Member Tracking
![]()
![]()
View member Education Tracking any time from the Education Requirements Tracking Form. This form lists your members alphabetically, by name. Locate a member to see whether they have completed their ethics requirements at a glance. Use the radio button to view all members, with or without tracking records. Narrow your selection by clicking the “Only Members with Tracking History” radio button.
Step 5 – Send Certificates
This final step is optional and can be performed if you want to create a mail merge in Microsoft Word to send certificates to members who have completed their COE training.
![]()
Use the Education Tracking Merge Form to create a data file so that you can send letters or certificates to the members who have fulfilled the requirements for a category.
![]()
Education Tracking Report
Run the Education Tracking Report any time to determine which members have completed their COE education and which members are still pending.
![]()
You can run the report for members in the Pending status, Completed status, or both. Always elect to include members without registrations since you want to track all of your Realtor members and not just those who have registered for a class with you.
![]()
Education Tracking Update
Cloud AMS provides an Education Tracking Update utility to help keep your records current and update professional designation or continuing education requirements. If a member has an education tracking record created, the utility will check the class registration records and determine if the member has met the requirements for a certain education category. The software uses the Grade Code Table to determine if the member qualifies to receive credit for a class. If a member has fulfilled all of the requirements, the software will perform the following tasks:
- Change the education category Status for the member from Pending (P) to Completed (C).
- Change the Completion Date to the class date that fulfilled the requirements or to a date that you specify.
- Add a professional designation to the member's record, if appropriate.
Running the Education Tracking Update:
![]()
NOTE: If the software finds a member education tracking record with a Completed (C) status for a member who has not actually fulfilled the requirements, the program will change the member’s Status back to Pending (P) and set the Completion Date to 00/00/00.
Education Transmittal Setup
First, you must determine which courses are needed to complete ethics requirements for the current quadrennial.
![]()
Locate the Category for the quad period and click the “Requirements” button to display the Category Requirements Form.
![]()
The Course Number field needs to translate to the correct Course ID in order to be accepted at NRDS.
Please see below for an explanation of Course ID translation:
![]()
Next, navigate to Communication module > Data Exchange > Send Transmittals to access the Send Transmittals section. Click the Setup tab and then Receiver Information. You should see EDUC in the Receiver ID column and NRDSMSTR in the Transmittal Grp column. Click the Education tab and you will see the course IDs that qualify for transmittal. All courses that pertain to the current quadrennial should be located here and checked to send.
![]()
![]()
Once your setup is complete, you can now run a manual transmittal to NRDS to send the education information. Go to Managers > Data Exchange > Send Transmittals and choose the “Education Transmittal” option. Zoom to select the proper receiver and then choose a date range. If you have any further questions, please contact support.
