
Merge
Email Merge
| Title: | Email Merge |
| Submitted by: | Rapattoni Software Support |
| Issue: | I know how to perform a merge and pull data from Magic, but how exactly does an e-mail merge work? |
The following steps are intended to help you perform an e-mail merge using a Rapattoni Magic data file. For detailed information on creating a merge data file, please refer to Chapter 6 Introduction to Magic Merge in the "Getting Started Manual" that is located in the Help menu under Documentation.
This procedure is designed to be a guideline only, since you may be using a different version of Microsoft Outlook or Microsoft Word than the versions demonstrated below.
Perform a merge in Rapattoni Magic. Be sure to select E-Mail Merge in the Merge Options Form.

Open your Microsoft Outlook. You must have the full version of Microsoft Outlook, because this procedure will not work with Microsoft Outlook Express.
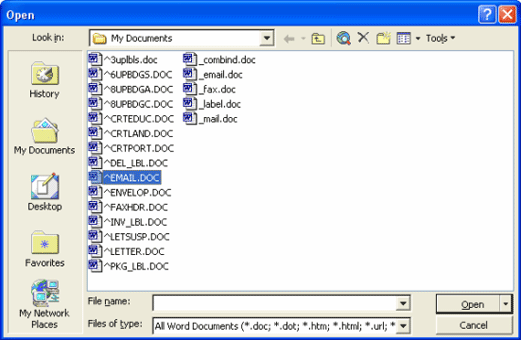
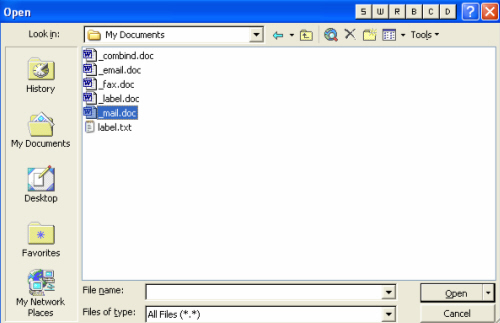
Next, open up Microsoft Word. Click on the File pull-down menu and select Open. You will need to locate the folder that contains your merge data. Since you are familiar with merging date from Magic, you will know where to locate this folder, but quite often it is in your c:\my documents\ folder.
Locate and open the file ^email.doc. This is an e-mail merge template. Open the template as a read-only file.
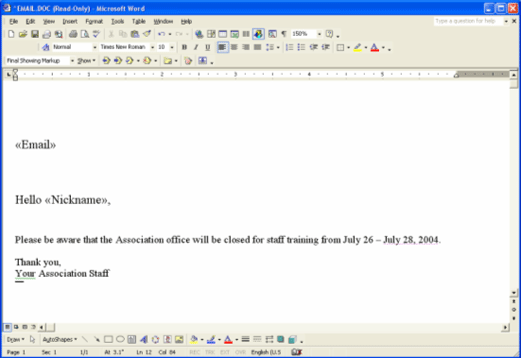
The e-mail template should look like our example below. We have added a customized message to our e-mail template example.
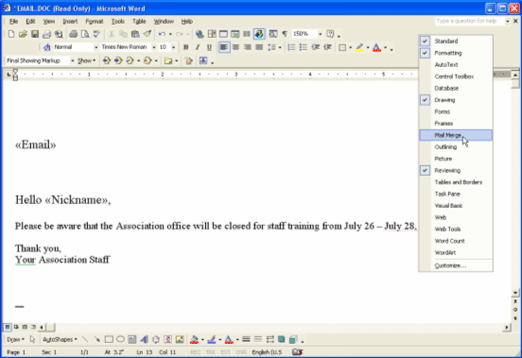
After you have added your customized message, you are ready to merge your data into the template. The easiest merge method is using the Merge toolbar. To open the Mail Merge toolbar, right-click anywhere in the empty space to the right of your current active toolbars and left-click on Mail Merge.
The following toolbar will become visible. Versions of Microsoft Word vary, but all versions have a Mail Merge toolbar.
![]()
Click the Open Data Source button which we have circled in red. The Select Data Source window will open, and you will need to locate your _email.doc merge data file. Double-click on the _email.doc file and you will see a slight flashing, then the Select Data Source window will close.
To merge the data that you have just selected, click the Merge to E-mail button which we have circled in green. Make sure your Microsoft Outlook is open before clicking this button. A Merge to E-mail window will open allowing you to enter a subject line for your e-mails.
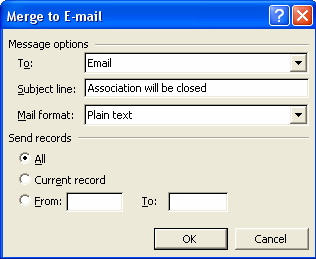
Click OK and the software will now merge your e-mail template with the data file. Newer versions of Microsoft Outlook will display the following security message that will require you to click the "Allow access for" check box and select the time increment of 10 minutes.
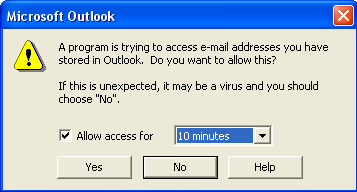
After you click Yes the software will automatically send the resulting e-mail messages to your Outbox in Microsoft Outlook. This process is usually very quick. When Microsoft Word finishes the merge, look in your Microsoft Outlook Sent Items folder to verify that the e-mail messages have been sent. Once the messages have been added to your Sent Items folder, the merge is complete.
TIP: In the Rapattoni Magic 8 Multimedia CD-ROM Tutorial, lessons 10 and 11 under
"Rapattoni Magic Basics" walk you through the e-mail merge procedure step-by-step.
Exporting Rapattoni Magic Data Into Microsoft Excel
| Title: | Exporting Rapattoni Magic Data Into Microsoft Excel |
| Submitted by: | Rapattoni Software Support |
| Issue: | How can I export data from Rapattoni Magic into Microsoft Excel? |
Do you ever have the need to export data from Rapattoni Magic? Our software allows you to export any merge data into Microsoft Excel. You can take advantage of this feature from any merge form and once merged, the data can be formatted any way you like.
To Export Data:
- The first step is to select and run the merge in Rapattoni Magic. Once you complete the merge, a file will be saved in your Magic users directory (e.g. C:/my documents). The data file will be stored in the appropriate merge file (_email.doc, _mail.doc, _fax.doc, etc.), depending on the type of merge you choose.
- Next, open up Microsoft Excel.
- Click on File and then Open. When the Open box appears on your screen, you will need to change the "Files of Type" to "All Files" in the drop down menu.
- Select the merge file that was saved in your Magic users directory (e.g. _mail.doc ) and click Open.
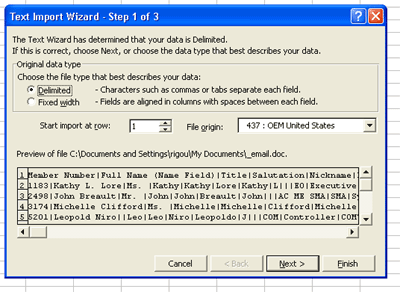
- When the Text Import Wizard box appears, select Delimited and click Next.
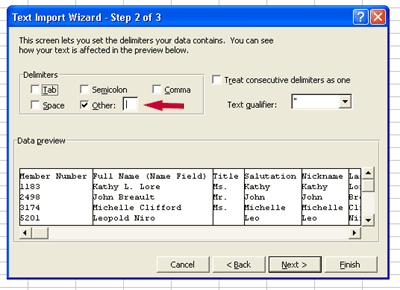
- In the next step, you need to select the delimiter. In most cases, the delimiter is the pipe delimiter (|). Check the "Other" box and type in the pipe delimiter (usually located above the Enter key on your keyboard)
- Click Finish to complete the process.
The merge file that you created is now in Microsoft Excel, and you now have the ability to sort the information, delete unwanted columns, modify data, etc. This feature gives you more flexibility and can be used as a very powerful tool.
Identifying and Correcting "Undeliverable" or Non-Existent E-mail Addresses
| Title: | Identifying and Correcting "Undeliverable" or Non-Existent E-mail Addresses |
| Submitted by: | Rapattoni Software Support |
| Issue: | How do I correct "undeliverable" or outdated e-mail addresses in my Rapattoni Magic database? |
Have you ever sent an e-mail to your members and received a message back telling you that certain messages could not be delivered because of an invalid address? This is usually caused by an e-mail address that is outdated or does not exist anymore. In many cases, you have no way of identifying which member’s e-mail address this is referring to, so you can update it. This problem is most evident when doing an e-mail merge consisting of several e-mails being sent out at once. You can receive several of these "undeliverable" e-mail error messages, and it can be frustrating trying to correct them. As you probably already know, keeping e-mail addresses up-to-date is necessary to avoid communication problems between you and your members. This is especially important if your office uses e-mail billing.
There is a solution that will help you correct this problem. Rapattoni Magic allows you to look up the "undeliverable" e-mail address and associate it to a corresponding member in your database. Then, you can contact the member and obtain his/her correct e-mail address to update the database. This process of correcting and updating e-mail addresses can be done using the Internet Query Form.
Internet Query Form:
![]()
![]()

Select either Member or Office, depending on the type of e-mail address you are trying to update.
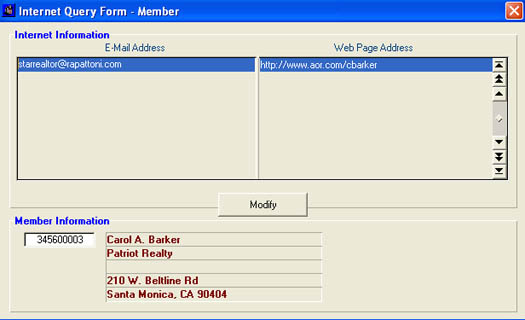
Make a note of the "undeliverable" e-mail address you are trying to locate. After opening the Internet Query Form, you can do a Range Search using that e-mail address.
In our example,
we received an "undeliverable" error message for
Importing member records from Rapattoni Magic to your Microsoft Outlook Contacts
| Title: | Importing member records from Rapattoni Magic to your Microsoft Outlook Contacts Folder |
| Submitted by: | Rapattoni Software Support |
| Issue: | Can I import member records from Rapattoni Magic into my Microsoft Outlook Contacts Folder? |
Rapattoni Magic gives you the ability to import your member records to your Microsoft Outlook Contacts Folder. This feature allows you to have easy access to all of your contacts, including email addresses in Microsoft Outlook. All of this can be done in Rapattoni Magic with one extra click of the mouse while you are running your merge.
Importing records into Microsoft Outlook:
You simply need to check the box labeled “Import into MS Contacts?” Then, continue to run your merge just like you are accustomed to doing. When you open up Microsoft Outlook after completing the Rapattoni Magic part of the merge, there will be a new folder called “Magic” in the contacts folder.
NOTE: If you choose to import any new records, any existing items in this folder will be deleted. If you want to save the folder and it’s contents, you should rename the existing folder under a different file name.
Merge Field Names Printout
| Title: | Merge Field Names Printout |
| Submitted by: | Rapattoni Software Support |
| Issue: | How to print out merge field names |
When doing a merge, wouldn’t you like to have a list of all of the possible fields that can be used in your merge? Instead of guessing what fields are available to you, you can use the Field Names Printout in Rapattoni Magic as a reference. This printout will display all merge fields, including general and merge specific fields. General merge fields are those that can be used in any merge that you perform (member status, ZIP code, bill type, etc). Merge specific fields are unique to the type of merge you are running. For example, if you are doing an education merge, certain education fields will be available to you (class time, class date, location of class, etc.).
Fields Names Printout
![]()
![]()
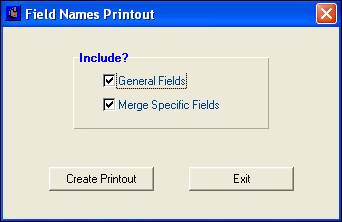
After selecting which fields you would like on the printout, click the Create Printout button.
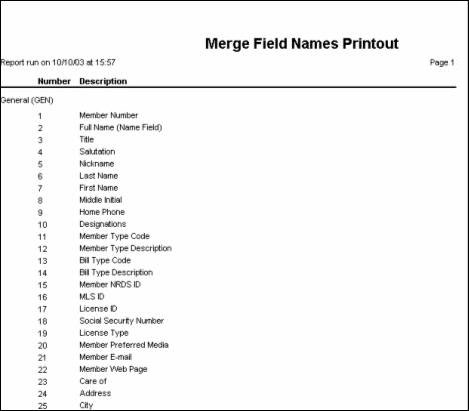
This sample of the printout will give you an idea of the format. At this point, you may print the document and keep it for your reference. The generic merge fields are located at the top of the printout, followed by the merge specific fields.
