
System Setup
NAR's Central Database (CDB)
| Title: | NAR's Central Database (CDB) |
| Submitted by: | Rapattoni Magic Software Support |
Issue: |
What is the NAR CDB mandate, how does it affect me, and what do I need to do about it? |
At the NAR annual convention in November 2007, the following resolution was approved:
All POEs should set a goal to be Central Database (CDB) compliant within two years of the date this policy is adopted, and that they must be CDB compliant within four years.
As a result of NAR’s resolution, all associations that serve as a Point of Entry (POE) for membership information are required to be CDB compliant by June 30, 2012. NAR has further stated that as of June 30, 2012, the existing NRDS batch upload/download will no longer be supported. This means that any association not CDB compliant will have to make all membership data changes manually on the Realtor.org website. This statement bears repeating:
If your association is not CDB compliant on June 30, 2012, you will need to make all of your member and office changes both in your local database and on the NAR Realtor.org site.
In response to NAR's mandate, Rapattoni spent over a year developing an optional CDB connectivity feature for Rapattoni Magic v9.28. This feature became available in the first quarter of 2010. Since then, CDB compatibility for Magic has been installed and implemented for a number of local and state associations. With this new feature, when a POE enters changes into their membership system, those changes are immediately updated in the National Realtor Database System (NRDS). Likewise, when a member changes personal information directly at NAR, those changes are updated automatically in the POE’s local database.
In addition to NAR connectivity, this new feature includes management utilities that assist you with implementation. They also provide support for the day-to-day issues that may arise. These sophisticated utilities allow you to use your Magic system even if the CDB site is down because your changes can be automatically pushed to NAR once the CDB is back up again.
Rapattoni believes that many of our 250 customers will wish to purchase this new module to become CDB compliant. Converting your system to use the CDB will require training and an implementation plan. Rapattoni will be happy to assist you. The amount of time required for this process will vary; however, you should allocate at least two weeks to become fully CDB compatible. Because a significant amount of both Rapattoni technical and support staff time is required during this implementation, you should schedule your installation well in advance of NAR’s deadline of June 30, 2012.
The best way to prepare your database for synchronization with the CDB is to review and clean up your data files so your system will be ready to communicate with NRDS. We have two Magic Resource Center articles that can help you clean up your data. Links to these articles are available here:
- Data Review and Clean Up – Part 1
What reports and utilities can help me review and clean up my Magic data? - Data Review and Clean Up – Part 2
What additional reports and utilities can help me review and clean up my Magic data?
Please note that you will need sufficient bandwidth for CDB connectivity. Also, the CDB module is only available for customers who are currently running Magic v9.28 or later. Customers with earlier versions of Magic must upgrade before the CDB module can be installed. If you plan on becoming CDB compliant by installing Rapattoni’s CDB feature, please call our Sales Department for a quote today at 1-800-722-7338.
For additional questions concerning CDB Connectivity, please contact our Magic Support Department at 866-730-7115.
Rapattoni Magic 8 Workstation Setup
| Title: | Rapattoni Magic 8 Workstation Setup |
| Submitted by: | Rapattoni Network Support |
| Issue: | How do I set up a workstation to access Rapattoni Magic 8? |
This documentation walks you through setting up a workstation to access Rapattoni Magic 8. It involves the installation and configuration of the Microsoft SQL Server Client and the installation of the Rapattoni Magic 8 Client.
NOTE: If this document does not answer your questions please do not hesitate to contact our Network Support Department at (866) 730-7115.
For the purpose of this document we will assume that the R: drive has been mapped to the magic share (Contact your local administrator if you need help with this).
A. Microsoft SQL Server Client Setup
NOTE: Close all other programs before starting this process.
1. Insert SQL Server CD, or Small Business Server Disk #2 into CD-ROM drive.
2. Run ‘setup.bat’ from the root of the CD-ROM.
3. You will get the following error message. Please click OK.


4. Click Next to begin the installation wizard.
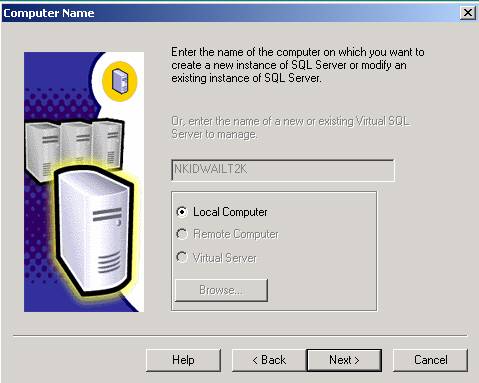
5. Make sure the Local Computer radio button is selected and click Next.
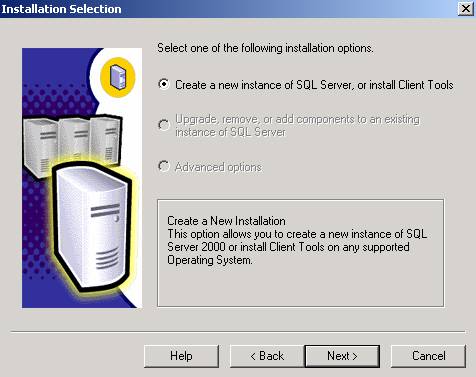
6. Select ‘Create a new instance of SQL Server, or install Client Tools’ and click Next.
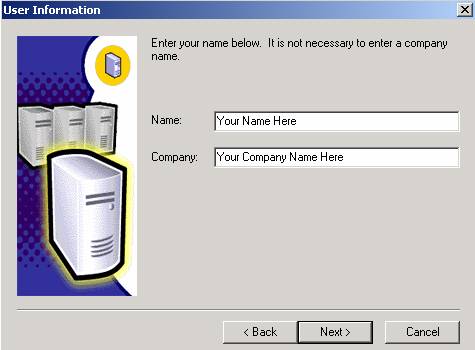
7. Enter your Name and the Company name.

8. Click Yes to agree to the license agreement.
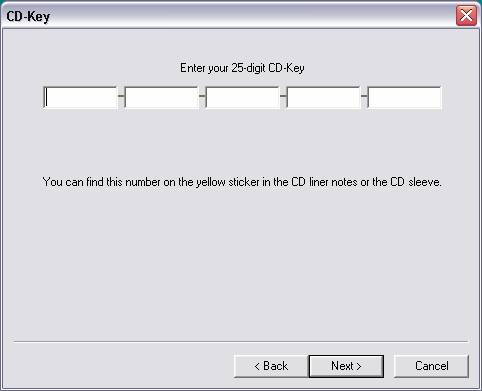
9. Type in your CD-Key that is located on the CD case and click Next.
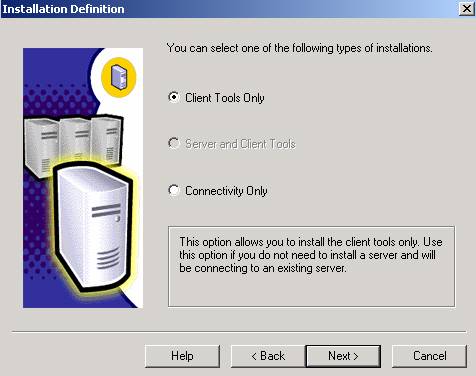
10. Select the Client Tools Only radio button and click Next.
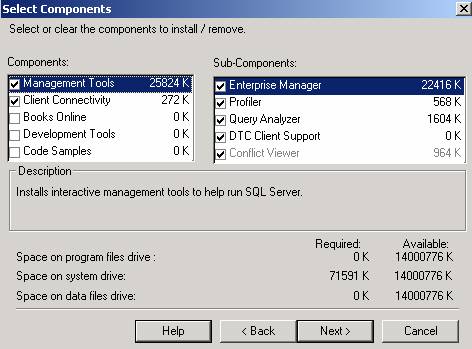
11. Place a "check mark" for Client Connectivity and Management Tools under components. For Sub-Components, place a "check mark" for Enterprise Manager, Profiler, Query Analyzer, DTC Client Support, and Conflict Viewer.
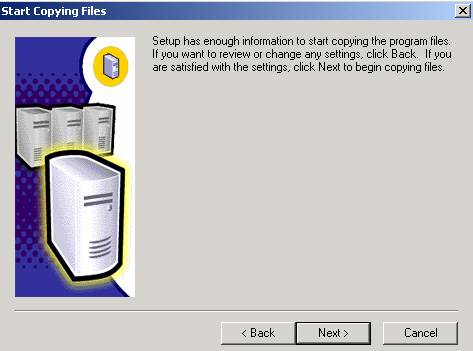
12. Click Next to start copying the necessary files.
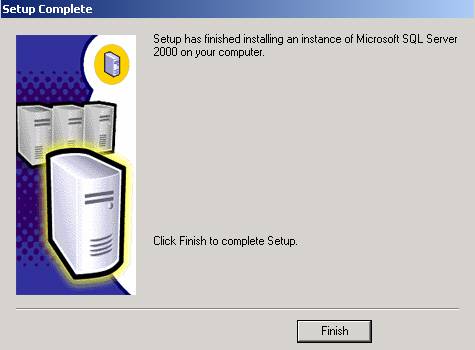
13. After all the files have been copied, click Finish. After this process is complete, it is time to configure the SQL Client Network Utility.
B. Configuring the SQL Client Network Utility
![]()
![]()
![]()
![]()
1. You need to open the setup form for the SQL Server Client Network Utility. This can be found under your programs.
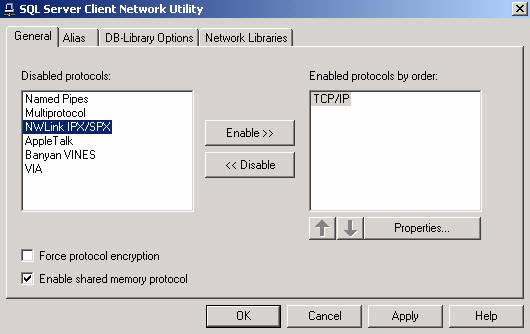
2. You need to disable all protocols except TCP/IP. TCP/IP should be the only enabled protocol. Next, click on the Alias tab.
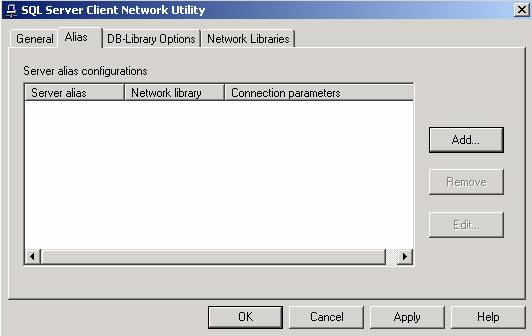
3. After clicking on the Alias tab, please click the Add button.
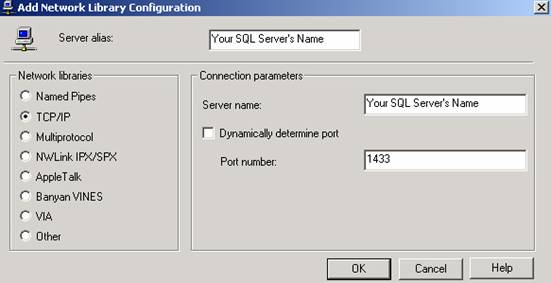
4. Select the TCP/IP radio button under Network Libraries. Then, enter your SQL server’s name under Server Alias. Also, make sure to uncheck the box for ‘Dynamically determine port’ and click OK.
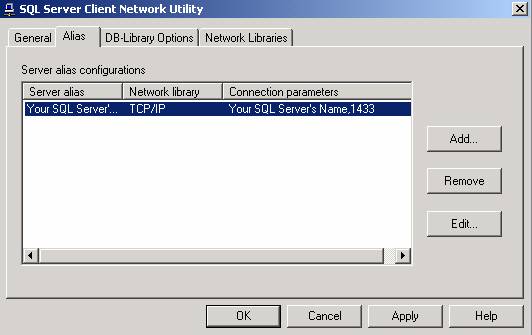
5. Your screen should now look like this under the Alias tab. Click OK.
6. Finally, the last step to installing the SQL Client is to install the latest SQL Client Service Pack. As of 01/23/03 this is Service Pack 3 for MS SQL 2000. You can download it from: http://www.microsoft.com/sql . Please consult your Network Administrator for assistance with this installation or contact Rapattoni Network Support.
After downloading it, run ‘setup.exe’ to install the service pack. Use all the default settings during the installation process.
C. Magic 8 Client installation
1. Navigate to r:\rap\ver8\install\client and run ‘setup.exe’
NOTE: R:\ denotes that the drive has been mapped to the Rapattoni Magic share through drive R. Please contact your Network Administrator for further assistance.
1. The ‘setup.exe’ file launches the Rapattoni Magic 8 client installation.
2. When prompted to make choices, leave the screen defaults as they are, and click the appropriate button to continue. When the setup is complete, click the Finish button.
3. This entire process should produce a shortcut to launch Rapattoni Magic. You can access it from your programs menu (Start-Programs-Rapattoni Magic).
If you have any questions regarding this process, please feel free to contact Rapattoni Network Support at (866)-730-7115.
The Importance of Database Backups
| Title: | The Importance of Database Backups |
| Submitted by: | Rapattoni Magic Software Support |
| Issue: | Why is it important to back up my Rapattoni Magic database? |
In the modern age of technology, the threat of Internet viruses, data corruption and hardware crashes is well known. The importance of consistently and thoroughly backing up your data cannot be stressed enough. Hardware can always be replaced; the years of information tracked about your members cannot.
In addition to implementing anti-virus and firewall protection, make sure that your association can answer "yes" to all of the following questions:
- Have you established a method of backing up data?
- Do you consistently back up your data on a regular schedule?
- Is your backed up database stored offsite in a fireproof container?
- If an unexpected disaster happened today, would your association be ready?
Answering "no" to any of these questions leaves your data vulnerable and may threaten your association's ability to perform its duties in times of disaster.
Please refer to the chapter titled "System Maintenance" in your Rapattoni Magic Software Administrator Manual for recommended backup procedures, or contact Rapattoni Software Support for more information.