
Accounting
Adjusting Posted Payments
You cannot void a receipt once it has been processed especially credit card payments. If you want to make a change, you must perform an adjustment. There are a few steps in order to make the adjustments on both member’s account.
Correcting incorrect member’s account
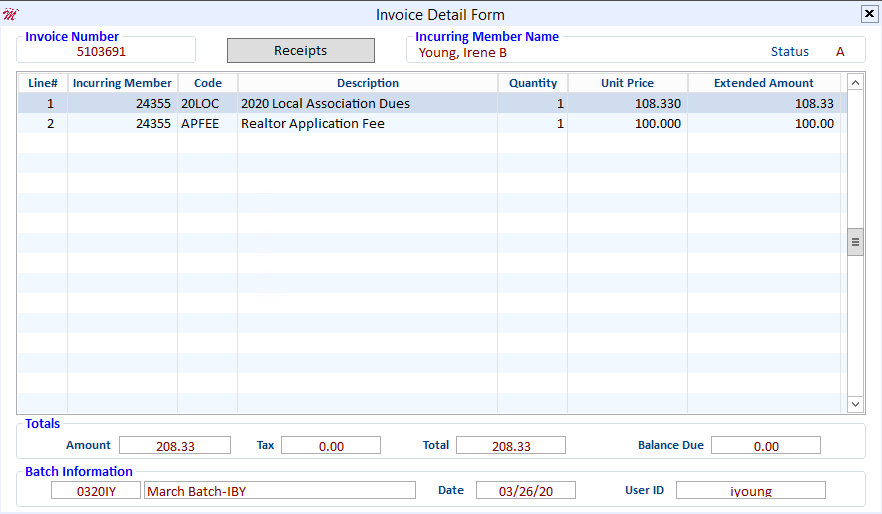
It’s best to take screen shots of the actual invoice and receipt of the incorrect payment to ensure you have all the details you need for correction.
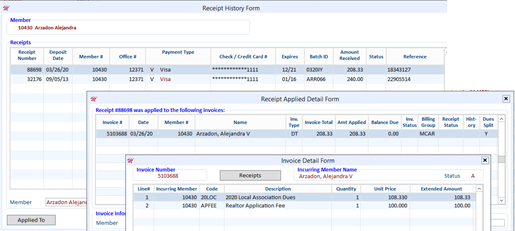
- Open the Cash Receipts Posting Form and enter a batch ID unless it’s on a different date of the actual payment you can use the same Batch #.
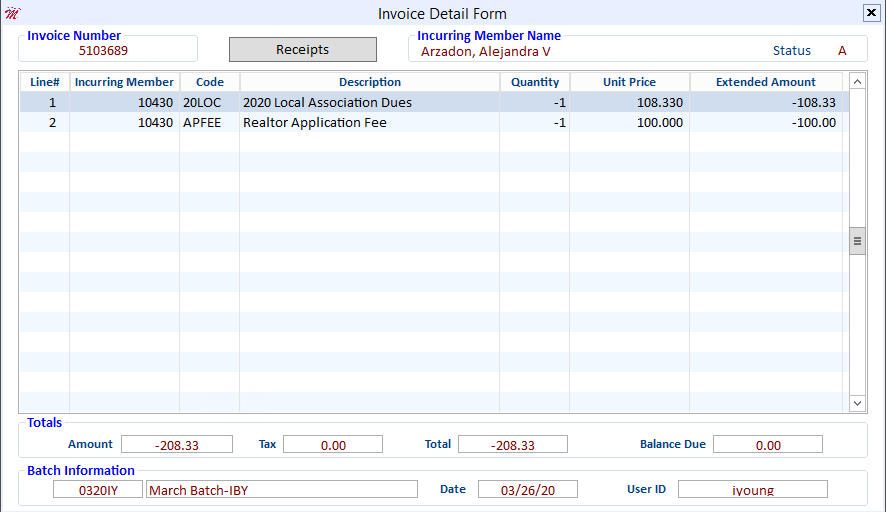
- Click the Create Invoice button- create a Negative invoice with the same charge code as the original invoice.
- Press Esc, then click the Charge button.
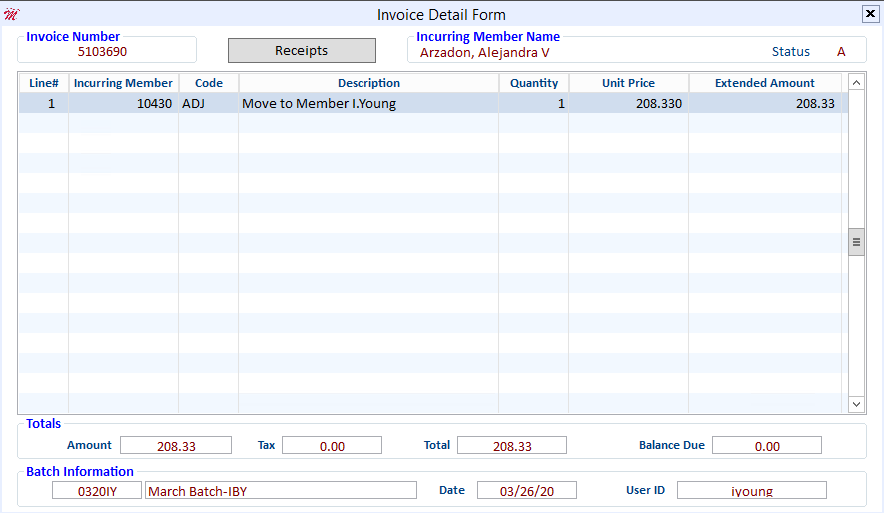
- Create another invoice using the Charge code ADJ – Change the Description to indicate where or which account you’re moving the charges to.
- Press Esc, then click the Charge button.
Remove the Payment from the Incorrect Account
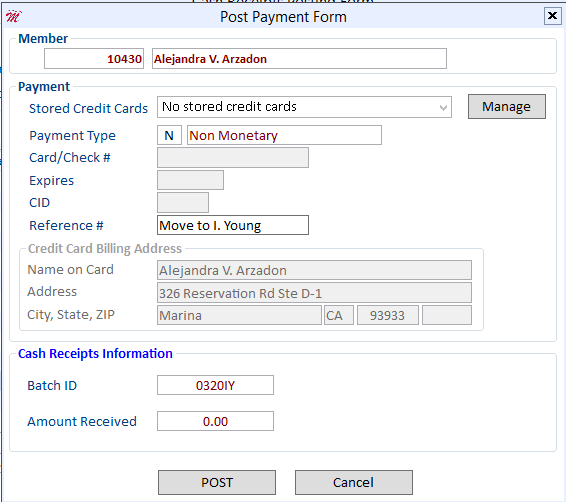
- Open the Cash Receipts Posting Form and enter the ID of the member account from which you will remove the payment.
- Make sure the Amount field shows an amount of zero (this is an adjustment, so cash is not involved)
- Click on the Apply box for the 2 invoices you just created.
- Post Payment Form will launch, with Payment Type of N - Non Monetary – Use the Reference # field to enter where or which account you’re moving the payment.
- Recreate the original invoice if this member still needs to pay for the invoice.
Creating transactions to the correct member’s account
- Click the Create Invoice button if an invoice doesn’t exist to create the invoice to pay.
- Create another invoice and use charge code (ADJ) and show a negative quantity of one -1 as the amount of the misapplied payment.
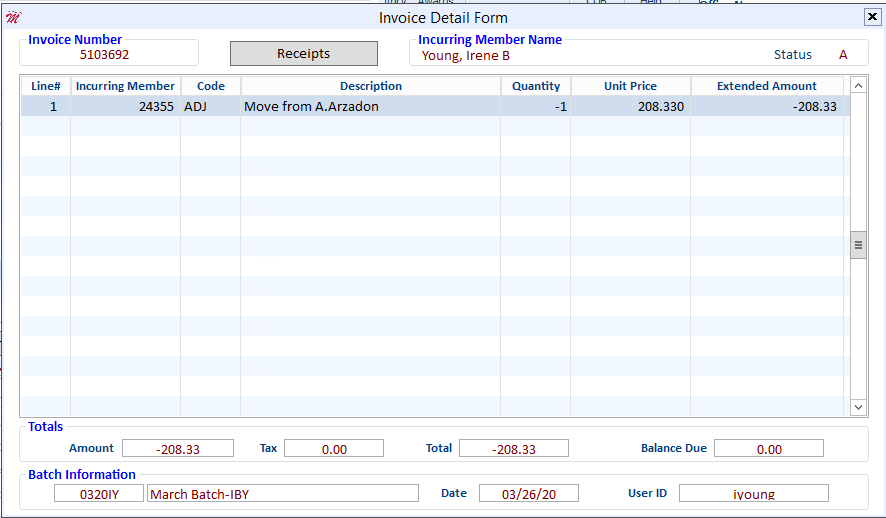
- Press Esc, then click the Charge button; the Cash Receipt Posting Form displays.
Apply the Payment to the Correct Account
- Open the Cash Receipts Posting Form and enter a batch ID unless it’s on a different date of the actual payment you can use the same Batch #.
- Enter the ID of the member for which you will apply the payment.
- Make sure the Amount field shows an amount of zero (this is an adjustment, so cash is not involved)
- Click on View All Invoices to display all transactions including paid invoices.
- Enter N (Non-Monetary Transaction) into the Payment Type field
- Enter a reference for the adjustment into the Reference Number field (i.e., misapplied payment)
- Select the invoice that the payment should have been applied to and click the Pay button; the invoice balance will change to zero.
The transaction to apply the payment to the correct account is now complete
An outstanding balance displays for the member and the transaction to remove the payment from the account is now complete.
Aged Accounts Receivable Report for Credit Balances
Association staff and members alike can easily forget about credit balances that exist in the members’ accounts receivable. Cloud AMS provides an excellent aged accounts receivable report that can list not only unpaid invoices, but credit invoices, too.
Aged Accounts Receivable Report are commonly used for members with open and/or unpaid invoices. Credit invoices show up as negative invoices in the member’s A/R. To create an aged accounts receivable report that only includes credit invoices, using the Invoice Balance fields enter a From amount of -9,999,999.99 and a Thru amount of -.01. The report generated from our example below will show a detail of each member’s credit invoices, sorted alphabetically by member name.
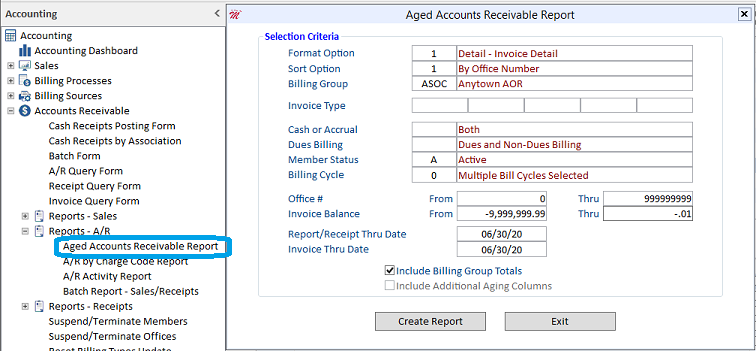
Run the report using various format and sort options until you find the format that best fits your needs.
Once you have printed the report it will be easy to tell at a glance which members have credit invoices. You can then decide whether to refund the credit, manually apply it to an invoice, or use the Auto Apply Credits Utility.
Auto Apply Credits
Many users are not aware of a very useful accounting utility in Cloud AMS that allows you to automatically apply credits, besides manually having to process them. This process can be a real time saver for you and your staff! This feature allows you to apply all specified outstanding credits and debits against each other.
Auto Apply Credits is particularly useful when run just prior to printing statements, since it can potentially eliminate phone calls about why a credit was not applied.
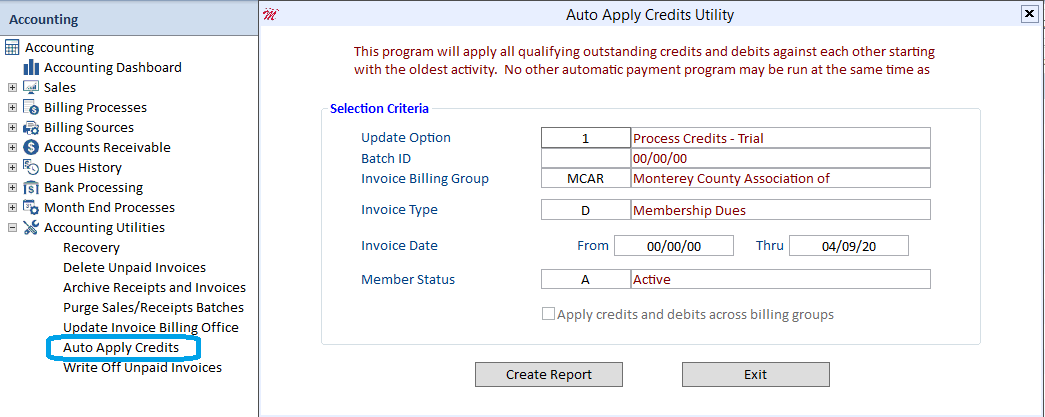
Auto Apply Credits Utility defaults to Update Option 1 – Process Credits – Trial you will have the chance to review the report before you do the actual process. After you review the Trial Report run the program again, on the Update Option F5 to choose 2 – Process Credits - Actual
Batch ID Hit F5 to choose the Batch ID
Invoice Billing Group F5 to choose the Billing Group or Clear All then Select All or type in the Billing Group.
Invoice Type F5 to choose or Clear All then Select All to choose all Invoice Type
Invoice Date you can leave as is so it will capture all dates
Member Status F5 to choose or enter A for just Active members
NOTE: You can run this utility as a trial first by selecting the trial option under Update Option. After the process is complete, you can print out a copy of all of the credit and debit transactions for your reference.
Billing Messages – Where they display in Cloud and Member Portal
There are five billing messages that appear in various places during the billing process. These messages should be created prior to performing your billing.
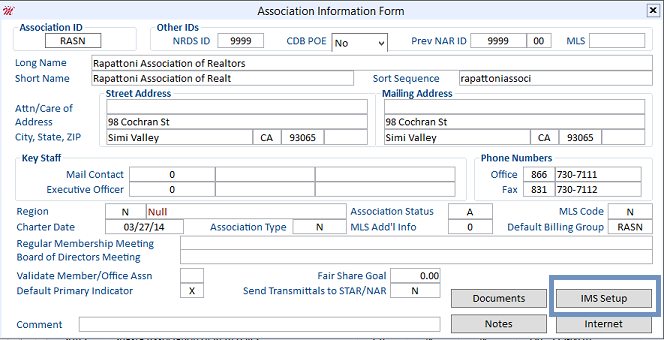
Any documents that you would like to make viewable when members pay dues in the Member Portal must be stored in the webs/documents folder on the webserver. You can get the path by opening the Association Information Form and clicking the IMS Setup button, as shown below:

There are five types of billing messages available. They are as follows:
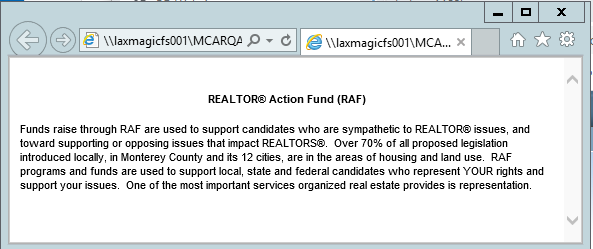
- Invoice Type Table> Disclosure File Name - Document that is stored in the documents folder on the webserver. This message appears when you click the blue invoice number hyperlink in the Member Portal (see the example below).
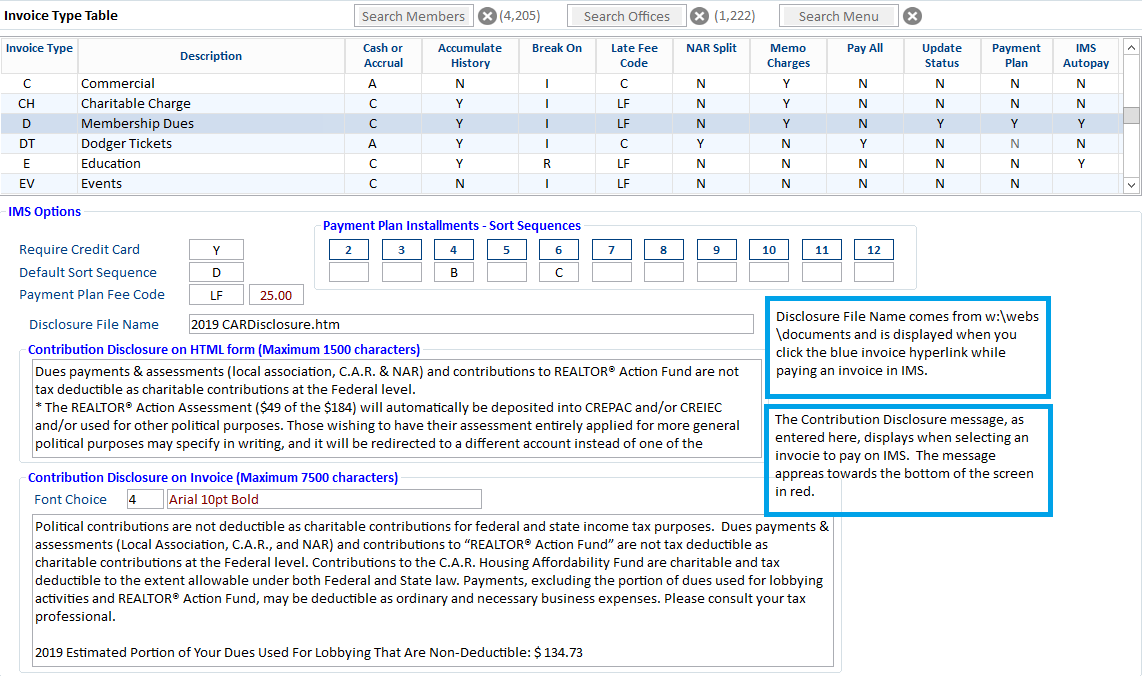

- Invoice Type Table> Contribution Disclosure (Maximum 1500 Characters) - Shows at the bottom of the screen when you select an invoice to pay in the Member Portal.
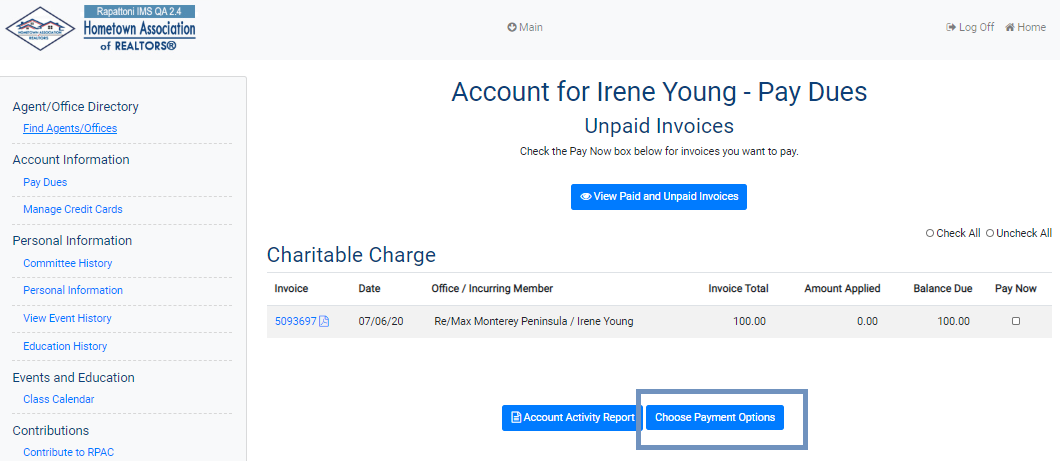
Check the "Pay Now" box for the desired invoice and then click the Choose Payment Options button.
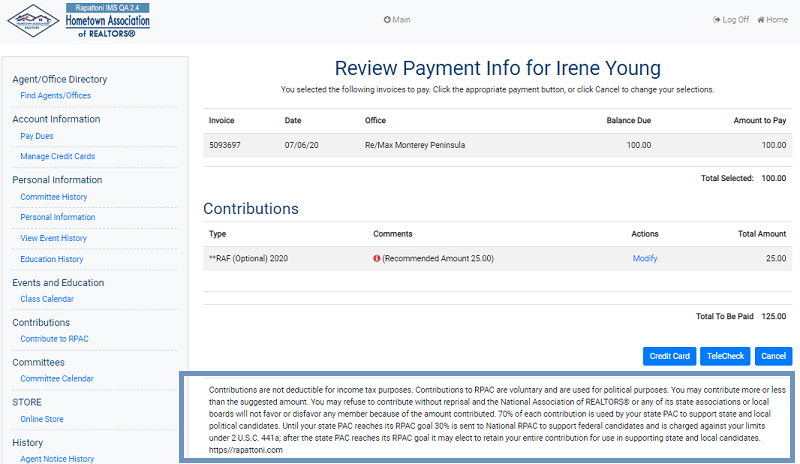
- Contributions Messagein Member Portal (the one that can be modified to be specific to each memo charge) - Shows when a member clicks the Modify button in the Member Portal.
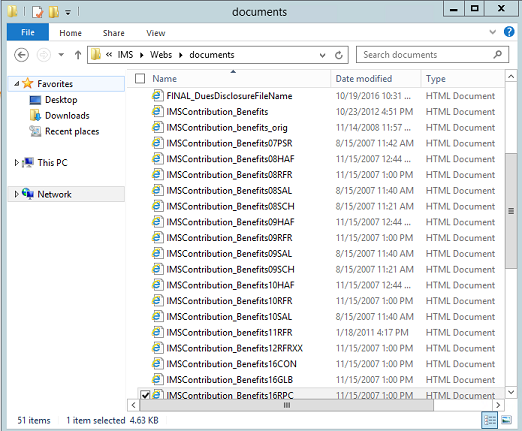
There is a generic IMS Contribution message in the w:\webs\documents folder. You can customize the message by copying it and changing the name to include the charge code at the end of the name.
When you click double click on the filename, a box pops up. This is where the Contributions Message appears.

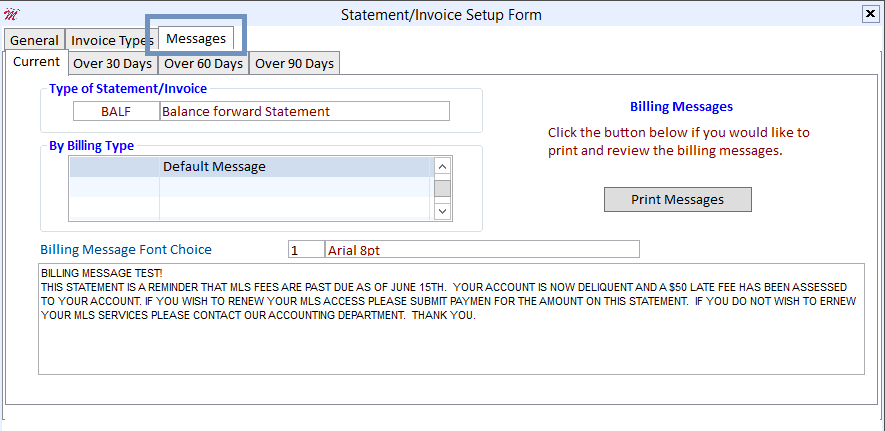
- Print Statement/Invoice Form- Aging Messages - Shows on statements.
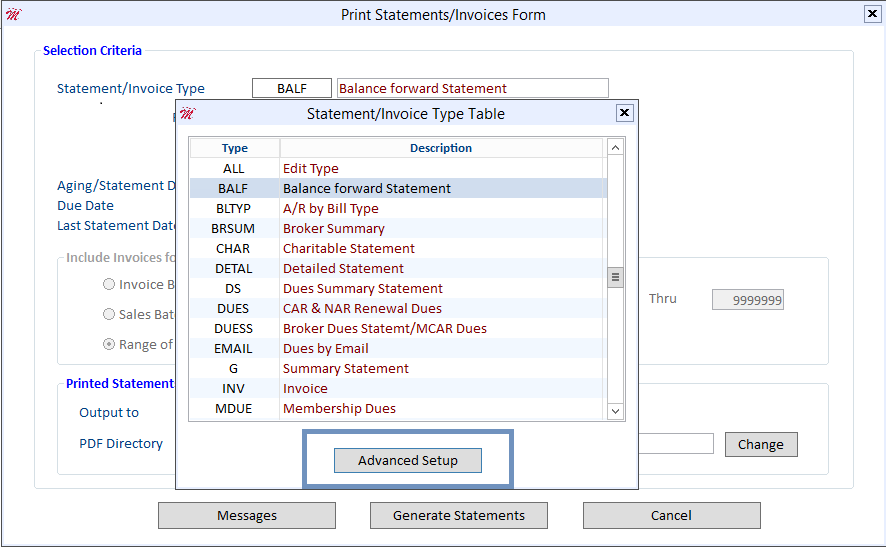
Select the statement/invoice type and then click the Messages tab.

Type your message here. When your invoice is printed or a PDF is created, this message will appear on the invoice. When you view your printed statement/invoice or your PDF from email billing, your aging message appears below the line items.
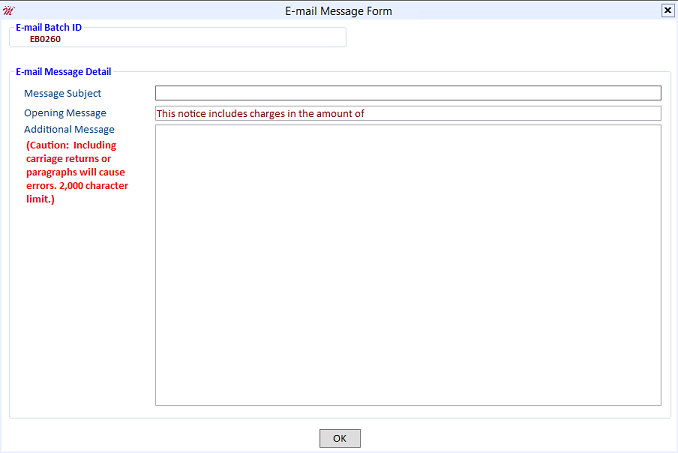
- E-mail Billing- E-mail Message
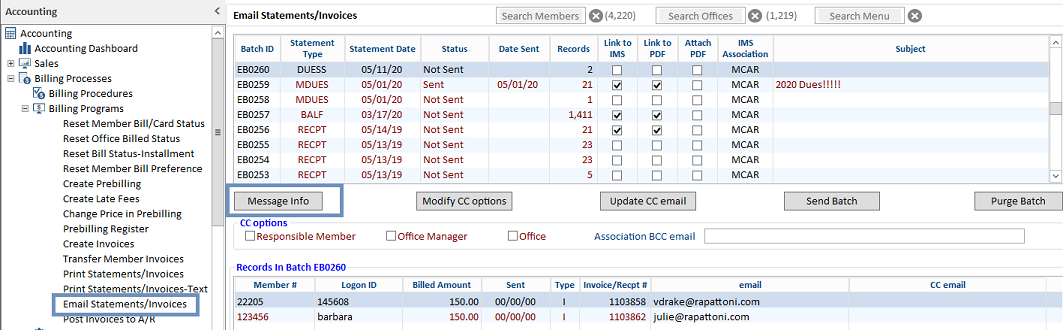
This message shows in the body of the email that the member receives. From the E-mail Statements/Invoices Form, click the Message Info button.

Type your subject and a short message here.
Your message will display in the body of the email that is sent to the member. It will appear right above the links to the Member Portal and the PDF.
Billing Messages – Where they display in Magic and IMS
| Title: | Billing Messages – Where they display in Magic and IMS |
| Issue: | How do I setup/manage my billing messages in Cloud AMS and IMS? |
There are five billing messages that appear in various places during the billing process. These messages should be created prior to performing your billing.
Any documents that you would like to make viewable when members pay dues in IMS must be stored in the webs/documents folder on the webserver. You can get the path by looking at the Association Information Form and clicking the IMS Setup button, as shown below:


There are five types of billing messages available. They are as follows:
Invoice Type Table > Disclosure File Name - Document that is stored in the documents folder on the webserver. This message appears when you click the blue invoice number hyperlink in IMS (see the example below).


Invoice Type Table > Contribution Disclosure (Maximum 1500 Characters) - Shows at the bottom of the screen when you select an invoice to pay in IMS.

Check the "Pay Now" box for the desired invoice and then click the Choose Payment Options button.

Contributions Message in IMS (the one that can be modified to be specific to each memo charge) - Shows when a member clicks the Modify button in IMS.

There is a generic IMS Contribution message in the w:\webs\documents folder. You can customize the message by copying it and changing the name to include the charge code at the end of the name.
When you click double click on the filename, a box pops up. This is where the Contributions Message appears.
Print Statement/Invoice Form - Aging messages - Shows on statements.

Select the statement/invoice type and then click the Messages tab.
Type your message here. When your invoice is printed or a PDF is created, this message will appear on the invoice. When you view your printed statement/invoice or your PDF from email billing, your aging message appears below the line items.
E-mail Billing - E-mail Message

This message shows in the body of the email that the member receives. From the E-mail Statements/Invoices Form, click the Message Info button.
Type your subject and a short message here.
Your message will display in the body of the email that is sent to the member. It will appear right above the links to IMS and the PDF.
